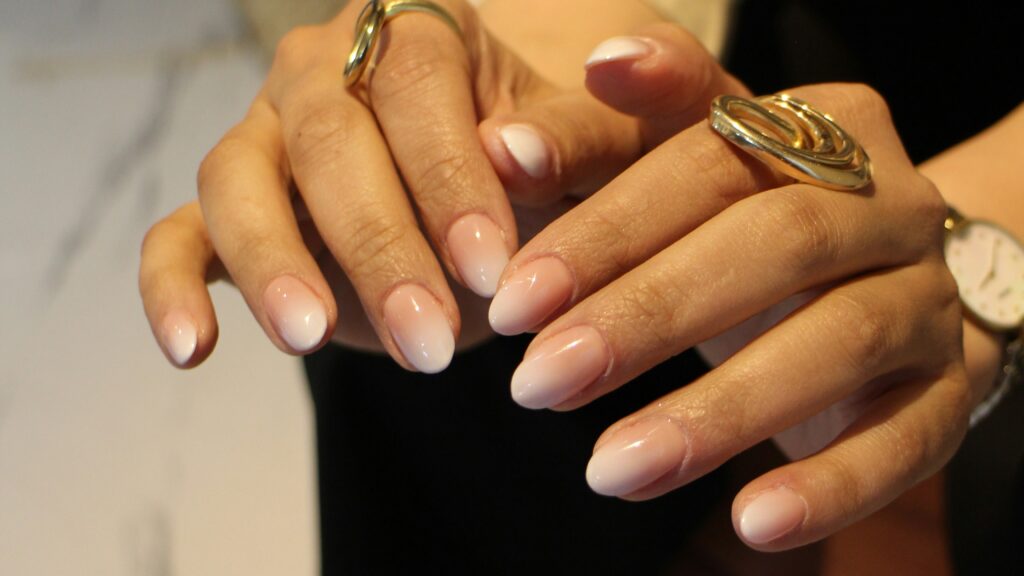
Nude ombre nails blend two or three close-in-tone nude shades, like beige into ivory or blush into champagne, so the color shift looks soft and natural instead of like an obvious gradient. The low contrast between shades is what sets it apart from bolder ombre styles, and it’s what makes the manicure look polished rather than “done.”
Done right, the gradient barely registers. People notice your hands look polished. They don’t clock why. That’s the whole appeal.
This guide breaks down what makes nude ombre different from every other gradient manicure, how to get a clean blend at home, and where it fits next to nude nails as a style you can wear anywhere.
What Makes an Ombre Read as “Nude” Instead of Just Blended
The gap between your two shades decides everything. Wide gaps create a visible seam. Narrow gaps blend into what looks like one continuous color with soft dimension, which is the effect nude ombre is built around.
Two-Tone vs. Three-Tone Gradients
A two-tone nude ombre blends one shade into another. Think soft beige fading into a barely-there ivory. It’s subtle. It photographs well. It works for daily wear.
A three-tone version adds a middle shade to smooth the transition. This takes more skill, but it hides any harsh line better than a two-tone blend can.
Start with two tones if you’re new to this. Add a third once you’ve got the technique down.
Choosing Shades Close Enough to Avoid a Harsh Line
Here’s where most nude ombre attempts fall apart. People pick shades that are too far apart in value.
A deep caramel base with a stark white tip won’t blend smoothly. The jump is too big. You’ll see a visible seam no matter how carefully you sponge it.
Stick to shades within the same family. Beige into a lighter beige. Blush into a soft champagne. The closer the values, the easier the blend, and the more natural the finish looks.
If you’re not sure where to start, look at your existing polish collection through the lens used for nude nails: shades that flatter your skin tone rather than fight it. Ombre works the same way, just with two of them instead of one.
Nude Ombre Nails Ideas to Try
Once you understand the shade logic, the design options open up fast.
Classic Sponge-Blend Nude-to-White
This is the entry point for most people. A warm nude base fades into a soft white tip.
It’s close cousin to the milky white nails trend that’s been everywhere this year, except here the milky shade only shows up at the tip instead of covering the whole nail. If you’ve struggled with milky polish turning out streaky rather than smooth, that same opacity issue can show up in an ombre tip. Building thin layers matters here just as much as it does with a full milky manicure.
Nude-to-French
This one swaps the usual sharp French line for a soft transition instead.
Rather than a crisp white tip against a bare nail, the white blends gradually into a nude base. It reads as more modern and less severe than a traditional French tip design, while still keeping that clean, structured look people love about French manicures.
Nude Chrome Ombre
Adding a chrome powder over one section of a nude gradient creates a soft metallic shift instead of a flat one.
This works best over the lighter half of the ombre, near the tip. Applied too heavy, chrome can flatten the gradient effect entirely. A light, even dusting keeps it looking like a shift in light rather than a solid color change. For more on getting chrome application right, this guide to chrome nails covers the technique in depth.
Pairing With Shape and Length
Nude ombre isn’t shape-dependent, but some shapes show it off better than others.
Almond nails elongate the gradient because there’s more surface area running vertically. The fade has room to breathe. If you like that tapered look, these almond nail ideas pair naturally with a soft ombre.
Short nails work too, and honestly make the technique more forgiving since there’s less surface to blend across. These short nail designs are proof that a compact canvas doesn’t limit your options.
How to Get a Clean Gradient at Home
The idea is simple. The execution takes a bit of practice.
The Sponge Technique, Step by Step
- Apply your base coat and let it dry fully.
- Paint your lighter shade across a makeup sponge in a thin strip.
- Add your darker shade right next to it, slightly overlapping.
- Dab the sponge onto your nail, starting at the tip and working toward the cuticle.
- Repeat two or three times, reapplying polish to the sponge each time, until the color builds evenly.
- Clean up the edges with a brush dipped in acetone.
- Seal with a glossy or matte top coat.
Thin layers matter more than speed here. Rushing the sponge step is the fastest way to end up with a patchy, uneven fade.
Common Mistakes That Ruin the Blend
A few things trip people up every time.
- Loading too much polish on the sponge. This creates thick, uneven patches instead of a smooth gradient.
- Skipping the overlap. If your two shades don’t touch on the sponge, you’ll get a visible line instead of a blend.
- Moving too fast between dabs. Give each layer a few seconds before adding the next.
- Not cleaning the sponge between color changes. Old polish on the sponge muddies your next attempt.
Slow down. This technique rewards patience more than skill.
Gel vs. Regular Polish
Gel ombre lasts longer and resists chipping better than regular polish. It also cures under a UV or LED lamp, which locks the gradient in place before it has a chance to smudge.
If you’re doing gel, cure each thin layer before adding the next rather than trying to build the full gradient in one uncured pass. This keeps colors from bleeding into each other.
One thing worth knowing if you cure gel at home regularly: nail lamps, whether labeled UV or LED, do emit some ultraviolet radiation. Protecting your skin during manicures with sunscreen or fingerless gloves is a reasonable precaution regardless of which type of lamp your salon or kit uses. It’s a small habit that costs nothing and adds a layer of protection if you’re curing gel frequently.
If gel isn’t your thing, builder gel is worth a look for anyone who wants extra strength under an ombre design without sacrificing the natural finish. This guide to builder gel nails breaks down how it holds up over time.
Making It Last
Nude ombre nail polish is likely to last between two and three weeks when using gel nail polish; it is shorter when using regular nail polish.
The application of cuticle oil every day ensures that the skin around the nail does not dry and distract attention from the gradient color. Cleaning with gloves prevents exposure of the nail polish to chemicals. It is equally important to remove the gel nail polish correctly.
Peeling gel off damages the natural nail underneath. Following proper gel removal steps protects your nail bed so your next manicure, ombre or otherwise, has a healthy base to start from.
Frequently Asked Questions
What’s the difference between nude ombre and a French manicure?
A French manicure has a sharp, defined line between the nail and the white tip. Nude ombre blends the two shades gradually, with no hard edge.
Does nude ombre work on short nails?
Yes. Short nails actually make the blend easier since there’s less surface area to cover. The gradient just compresses into a smaller space.
Can I do nude ombre with regular polish, or do I need gel?
Either works. Regular polish is easier for beginners since mistakes are simple to remove and redo. Gel lasts longer but requires curing between layers.
How many shades should I use for the gradient?
Two shades work for a subtle, everyday look. Three shades create a smoother transition but take more practice to blend evenly.
Final Thoughts
Nude ombre nails don’t shout for attention. They earn it quietly.
The whole style rests on restraint: shades close enough in value that the blend looks effortless, not engineered. Get that part right, and the technique details fall into place.
Whether you keep it to a simple two-tone fade or add chrome, French tips, or a specific nail shape into the mix, nude ombre adapts to whatever look you’re already going for. It’s a gradient built to be felt more than seen.